DIY Farmhouse Dining Table for Under $300!

You guys! I BUILT A FREAKING TABLE!

I am pretty impressed with myself for how beautiful it turned out! Especially since I have NEVER used a power tool in my life.


This was a big undertaking but I have to say it was well worth the time and effort because I absolutely adore my new table and I love that I didn’t have to pay $2000 to buy one!

I found the plans for this table over at the fab site Shanty 2 Chic. This site is awesome you can find plans for just about any project and they’re all FREE. Jackpot.

Now, she was able to do it for $110. However, when I went to the Home Depot, I bought the most inexpensive wood I could find and it totaled in at around $200. Hopefully you will have better luck than I did!

This project took me about 2 weeks to complete working on it off and on. I think you could totally finish the construction if you dedicated a whole weekend to it.

Here are some things I learned along the way, being a COMPLETE newb to carpentry:

  1. Get the good tools. I attempted to start cutting my wood with a freehand circular saw. It’s almost impossible to get straight lines with that thing. Get a compound miter saw and you will save yourself the headache of re-cutting all your wood to get straight lines! (I was able to borrow one from John-John’s school but you can rent them at the Home Depot for around $40 a day!)
  2. Make sure you have all the tools you need before you begin:
    • A powerful drill with a a drill-bit set.
    • Compound miter saw.
    • Electric sander.
    • Kreg Jig System and the longest clamp you can find (I got mine from Amazon).
    • A work table or a pair of saw horses.
    • Gloves, protective glasses, and ear protection.
  3. Measure twice, cut once. I think this one is self-explanatory. 😉
  4. If some pieces are not perfect, it will be ok. There are a few 45 degree angle cuts for this table, and let me tell you not a single one of mine were correct! But I said “screw it” and it ended up working out just fine. I was close enough to fudge it and to be honest now it gives the table a bit more character and it also gives me something to laugh about whenever someone notices. 🙂
  5. You will make about 20 Home Depot trips just because you forgot something or you need just ONE more paint brush.
  6. You can TOTALLY do it by yourself. The only time I needed help was getting the thing up the stairs into my condo!
  7. HAVE FUN. I mean you’re building a table for goodness sake. Take your time. Learn.

I ended up painting my table a bright aqua color called Thai Teal, by Glidden, in a high-gloss because I wanted a bright pop of color in our condo; everything is super brown right now so I needed to make a big statement. Home Depot doesn’t carry Glidden though, but they’re able to look up the color and create the same exact color, just in Behr! (which I prefer anyways for its superior quality)


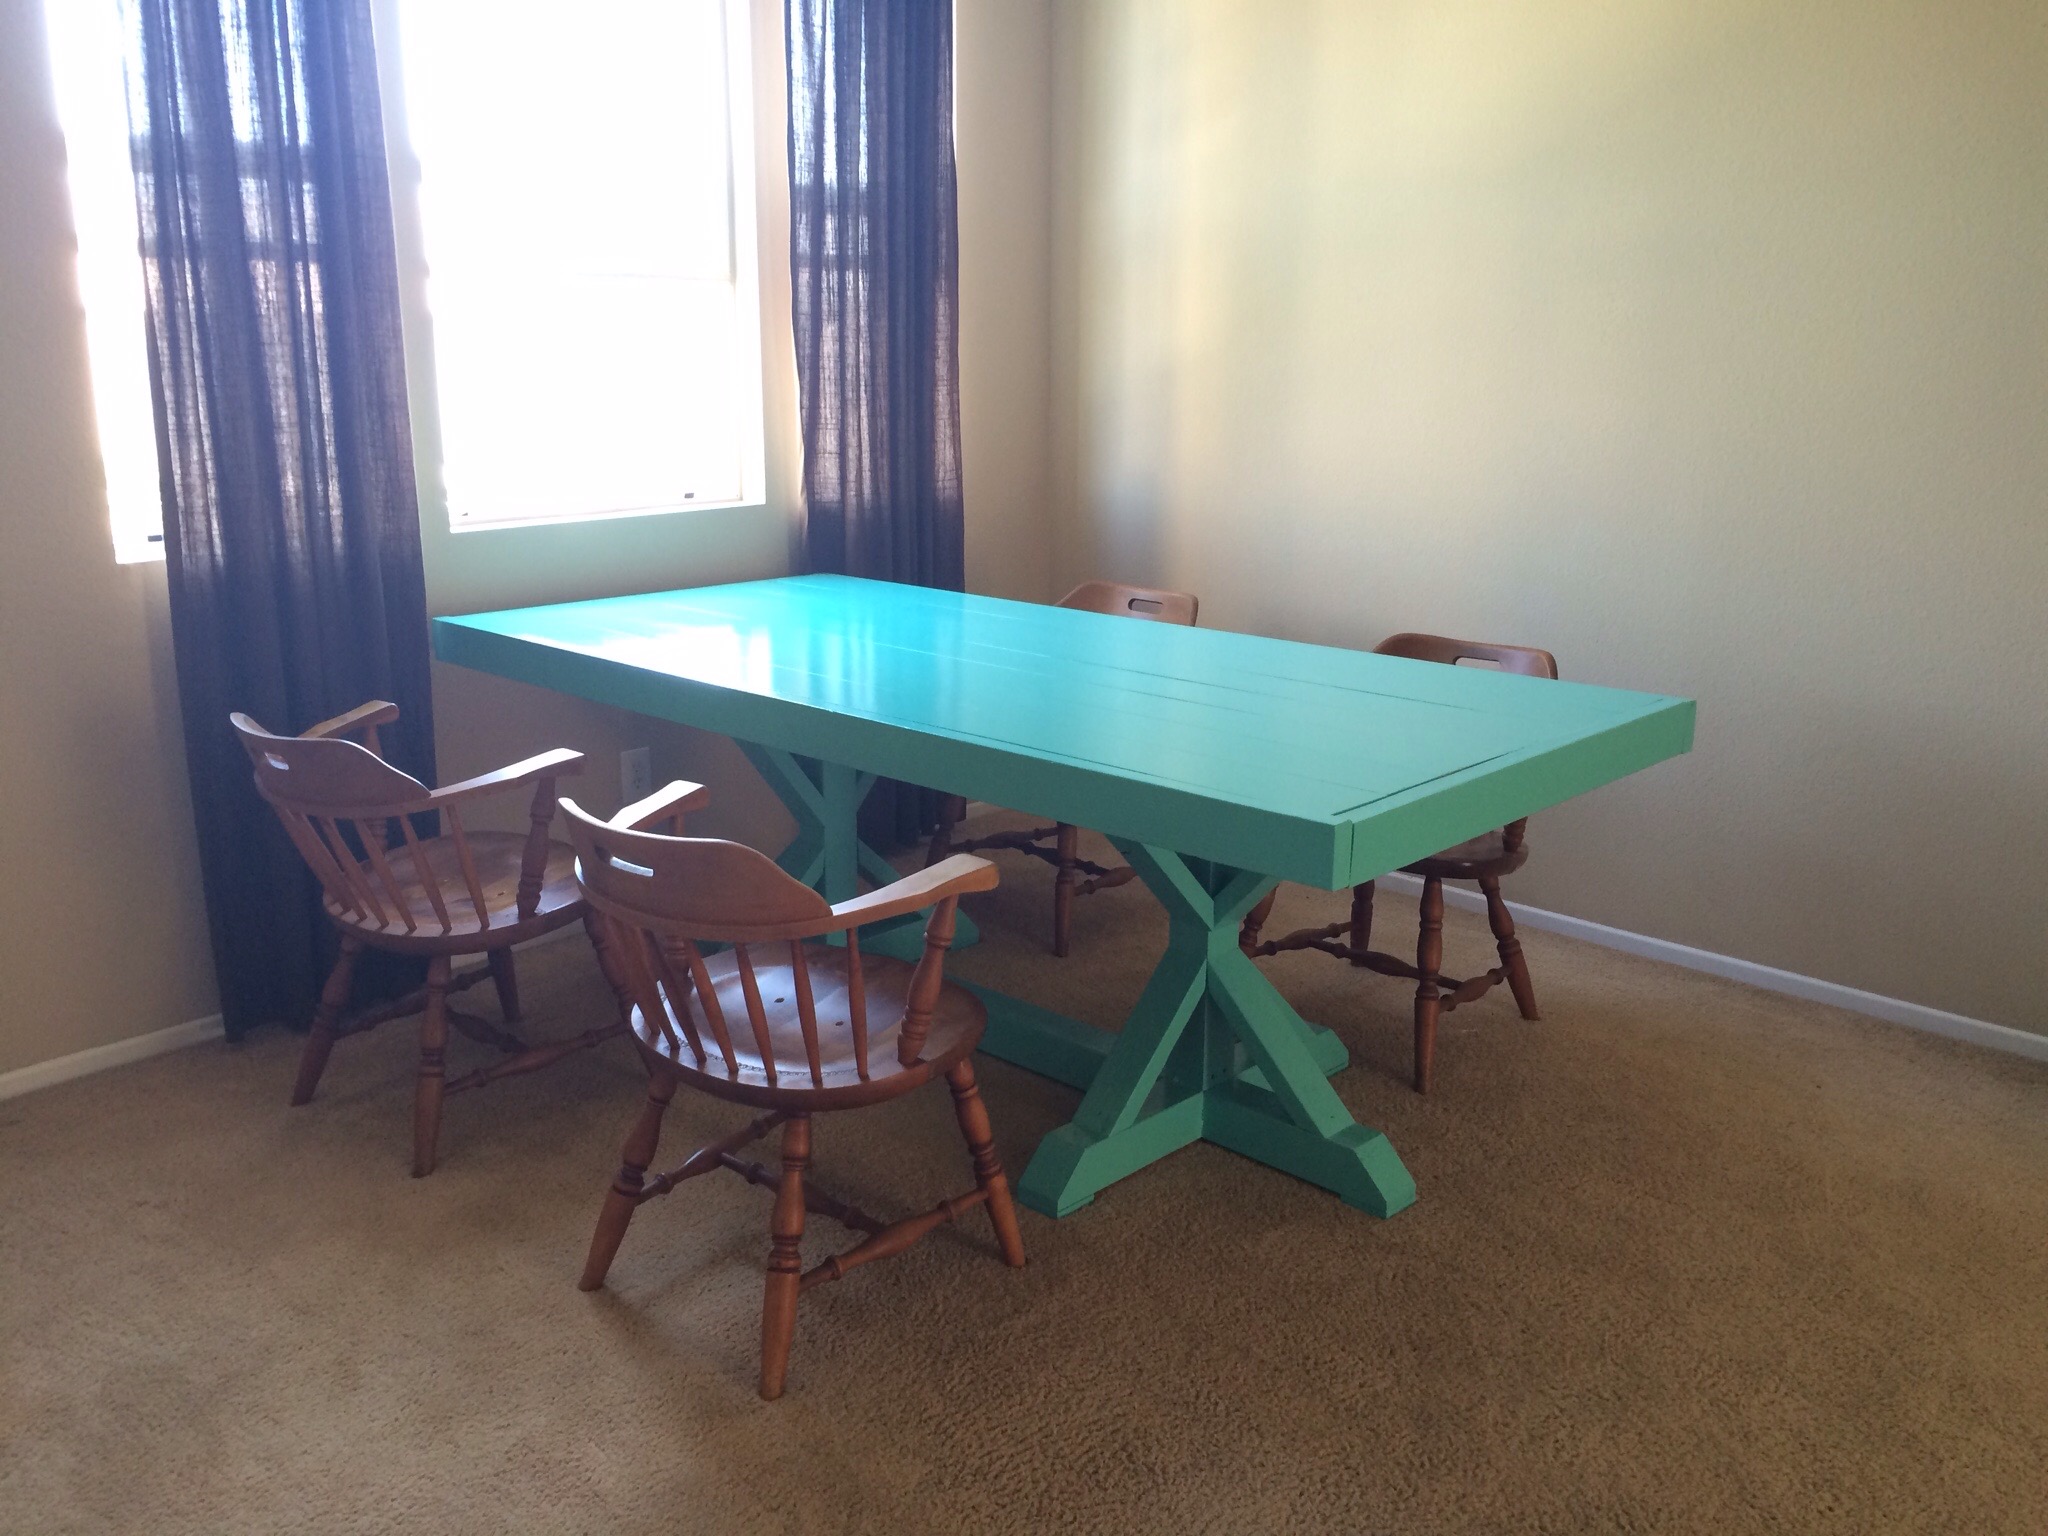
I did one coat of Behr primer/sealer, two coats of paint, and then 5 coats of Varathane Clear Gloss Polyurethane in Gloss. I HIGHLY recommend this top coat. It is mega-durable and gave my table a gorgeous almost lacquer-like sheen. This is the most time consuming part just because you have to wait about an hour to two hours between coats.

All in all I spent about $300 for this beauty! I even found the awesome vintage swedish chairs on Craigslist for $80 total! So for the entire set it was less than $400! However I will say that if you have to purchase tools, your costs will be much higher than my estimate. But ask around! You’d be surprised how many of your friends have tools laying around just waiting for you to come borrow them! Maybe bake them some cookies as a thank you for saving you hundreds of dollars. 😉

And ta-da you’re done! I hope this helped you guys and let me know if you end up making a table for yourself! xoxo

Advertisement

DIY Crate Desk for $100

Hello friends!

I’ve been wanting a desk for my living room now for a few weeks and I finally decided to just make one.


All the desks in the stores were either way too pricey or just not my style.

I was inspired by this desk I found on Pinterest and knew that Michael’s carries crates that would be perfect.

Here’s what you’ll need:

  • 4-6 Crates (depending on how high you want the desk, I used 6 to get it to bar-height)
  • A Desk Top from Ikea
  • 1 2×4 Wood Plank
  • Wood Glue (Gorilla Glue)
  • Sander & Paint Supplies
  • Paint & Polyurethane (optional)

I got my crates from Michael’s and lucky for me it was the Labor Day sale! So I got 40% off one crate and then the clerk gave me 20% off my whole purchase! Score!

Tip: Download the Michael’s mobile app, they ALWAYS have 40% off coupons and other deals on there!

The desk top from Ikea was about $30. But they had a smaller one that was only $9!!! I would’ve gone with that one but it would’ve been way too small for me.

I decided to paint all my crates white for a rustic feel, and then paint the desk top a gorgeous metallic Rose Chrome color by Martha Stewart for a hint of glam.

Sand down your desk top first and apply a primer before applying your paint and then finally polyurethane. (I used some leftover primer and polyurethane from my DIY Farmhouse Table)

For the crates I started by spray painting them with Rust-oleum’s Universal Paint and Primer. And let me tell you it didn’t do diddly squat. It gave the crates a kind of white-washed look, but I wanted them to be solid white. So I nixed the spray paint and bought some straight up white paint and applied it with a roller and brush.


Once all of your painting is done assemble your crates by glueing them together with some wood glue (Gorilla Glue works great).

Next measure the height of your crates and cut your wood plank to size to create two support beams.  I painted mine white to match.

And then finally either glue your desk top to the crates or just lay it on top. Add your support beams to the front or back with glue and you’re all done!


Now you have a stunning custom piece of furniture for half the price of a store-bought desk!

I found the super cute magazine files and organizing bins at Ikea for less than $10. The trash can is also Ikea just spray painted a metallic gold! Finally the bomb white barstool is a Craigslist steal for only $50!

Enjoy lovelies! xoxo

Find the tutorial on how to make the charging station here!

(I tucked a power-strip under the top crate on the left so that it keeps all the cords off the floor and so that my cords for the charging station are long enough to reach easily.)

DIY Lavender-Mint Deodorant

Hello lovely people!

Today I have this awesome and super simple DIY for all you people out there trying to cut out chemicals from your daily beauty routine and for those of us who simply can’t afford to spend $10 every time you need deodorant. SERIOUSLY. What’s up with natural deodorant being so freaking expensive?!

While I was in London a few months ago I was looking around Whole Foods for a new deodorant. Now I sweat A LOT due to the nature of my work so I need something that actually WORKS. I decided to splurge (10 pounds, which is practically $17!!!!) and bought the honey and milk Lavera spray deodorant.

This stuff smells awesome and it actually makes putting on deodorant kinda fun, but unfortunately it was not the most effective product I’ve ever used. If you don’t do much physical activity during the day, it would probably work just fine for you.

But the take away from this trial and error was that I discovered I much prefer spray deodorant to a roll-on, and also John-John would kill me if I kept spending $17 on deodorant ;). So I decided to make my own version so that I could customize my scent, save a ton of moolah, AND still have a luxurious experience with something as mundane as covering up body-odor.

Here’s what you’ll need:

1. 1/2 cup Witch Hazel
2. 1/4 cup Aloe Vera Gel (or juice)
3. 1 teaspoon Baking Soda (or more if you want it to be stronger)
4. Essential Oils of your choice (I used Lavender, Peppermint, and Eucalyptus)
5. Spray Bottle (bonus: I re-purposed the old Lavera bottle. At least that softens the blow of the price tag a bit.)

Instructions:

1. Combine the witch hazel, aloe vera, and baking soda in a cup with a spout for easy pouring later (you could alternatively use a bowl and a funnel).
2. Add around 5 drops of each essential oil to your mixture and adjust to your preference. (I find the Eucalyptus is what makes the fragrance really fresh.)
3. Pour into your bottle and DONE!

Seriously I don’t think it gets any easier than this.

And not to mention that all these ingredients are totes natural, good for you, and pretty household standard. The witch hazel is anti-bacterial which will help keep odor causing bacteria at bay, the aloe will soothe your underarms as it’s an anti-inflammatory, the baking soda neutralizes odors, and the essential oils also combat bacteria and make you smell oh-so-nice. Plus the spray aspect gives a wonderful cooling sensation on those hot hot days.

All together this product cost less than 5 bucks! What a steal!

Try it out and let me know what you think!

Note: This is NOT an antiperspirant. I am a firm believer that our bodies know how to take care of themselves and I am not about to get in the way of a process that cleanses and detoxifies our bodies.

UPDATE: Today I put this deodorant to the ultimate test. I went for a 2 mile run in 95 degree weather (call me crazy) and then did a full ab workout with lots of pushups and some weight lifting. I was completely drenched by the end and guess what? I was B.O. free! This stuff is serious business and I am SO happy with how effective it is!