Pacifica Beauty Vegan Skincare and Makeup Review

Hello lovelies! Today I wanted to share with you my thoughts on a big Pacifica haul I got a couple of weeks ago!

Does this ever happen to you where all of a sudden you run out of all of your beauty products all at once? Yeah, I had a minor freak-out moment when I hit the bottom of my Sunday Riley Enzyme Water Cream and my Fresh Soy-Face Cleanser in the same day! Yikes!

Anyways, a re-stock was desperately needed and I also wanted to dive into some more budget-friendly drugstore items. Thus Pacifica was discovered!

You can find Pacifica at Target, Ulta, or on their website and let me tell you I have fallen in love with this brand! They are a 100% vegan, cruelty-free, and natural brand and they describe themselves as “…the most innovative, creative natural beauty brand on the market with a full range of cosmetics, perfumes and skin care. Brook has elevated natural beauty with her unwillingness to accept substandard performance in natural products and has made it her personal mission to uplevel the perception of natural beauty products.”

Their products are super affordable, the packaging is unbelievably fun and cheerful, and the efficacy of the products is I would say at the level of high-end brands. (This post is not sponsored by the way, I purchased all the items myself and I’m not being compensated for my opinions.)

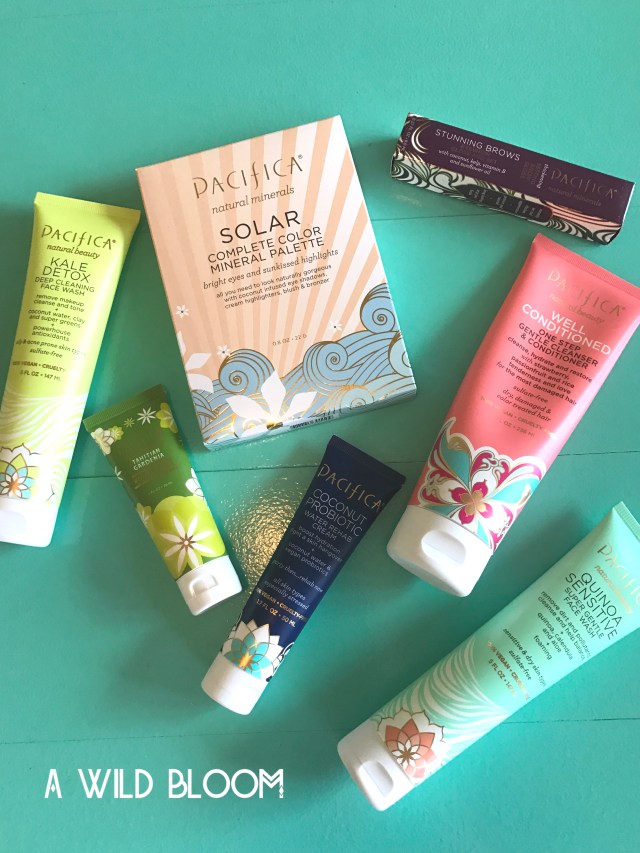
So here is what I purchased:

  • Kale Detox Deep Cleaning Face Wash
  • Quinoa Sensitive Super Gentle Face Wash
  • Coconut Probiotic Water Rehab Cream
  • Pore Refine Deep Detox Mask
  • Solar Complete Color Mineral Palette
  • Stunning Brows Eyebrow Gloss and Set
  • Well Conditioned One Step-Gentle Cleanser & Conditioner
  • Tahitian Gardenia Body Butter

IMG_0466

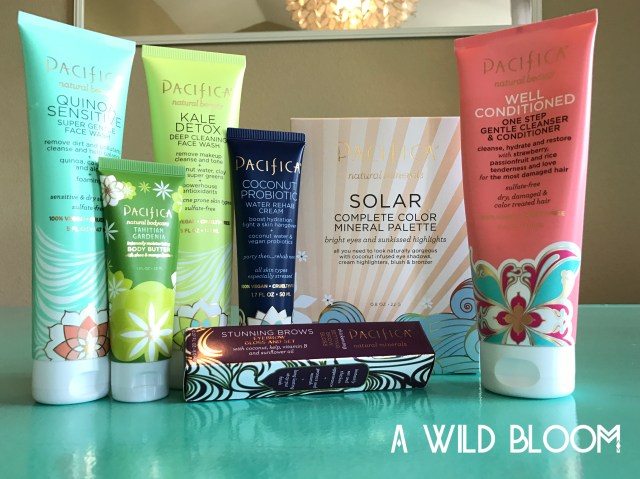
Needless to say I was VERY excited when this giant box of goodies came in the mail!

But enough chit-chat let’s get to why you’re here and talk about how great (or not so great) these products are!

Kale Detox Deep Cleaning Face Wash ($10):

I have been using this face wash every night with my Clarisonic and let me tell you it gets you CLEAN. It foams up really nicely and you feel like your face gets a deep clean without being stripped of all moisture by the time you’re done. It is fortified with kale, seaweed, mangosteen, and coconut water so you feel like you’re actually doing your skin some good while you’re cleansing! I will definitely be repurchasing this one!


Quinoa Sensitive Super Gentle Face Wash ($10):

This has replaced my Fresh Soy Face Cleanser in the mornings and I have to say it works just as well if not better! This one is fortified with quinoa, calendula, and aloe and foams up really nicely. I notice that my skin is calm, smooth, and balanced after I use it and it is a perfect step to prep your skin for skincare and makeup. The fragrance is also very light and pleasant for first thing in the morning!


Coconut Probiotic Water Rehab Cream ($15):

I have to admit, I am absolutely in LOVE with the Sunday Riley Enzyme Water Cream, but at $65 a jar it is a luxury I can’t always justify. This cream by Pacifica though, is a very close dupe. It is deeply moisturizing with hyaluronic acid and coconut but is very light and absorbs quickly so there is no residue left on your skin. It has been perfect at balancing out my combination skin. The only thing this cream doesn’t do that Sunday Riley does is brighten and exfoliate with the enzymes. But hey at a quarter of the price I’ll take it!


Pore Refine Deep Detox Mask ($18):

I expected this mask to be a clay mask when I purchased it but it is actually a peel! It uses a cocktail of konjac root, strawberry, cactus, and tomato to mattify your skin while deeply cleansing your pores and smoothing any texture. I’ve been using this mask 3 times a week and I have noticed a tremendous difference in the size of my pores and the uneven texture I have on my cheeks! It is great for keeping those little blackheads at bay and I feel like it tightens my skin.


Solar Complete Color Mineral Palette ($32): 

So this guy was an impulse buy as I certainly do not need another palette, but the colors in this set are gorgeous and I wanted to test out some of Pacifica’s makeup products. I will start off by saying that the eyeshadows in this palette are awesome! They are super smooth, easy to blend, and highly pigmented, I would highly recommend. The blush and bronzer are not quite the right shades for my skin tone, so I was a little disappointed that the palette only comes in one shade. Now, the highlighters. The colors are beautiful, but the formula is absolutely awful. I was giddy with excitement as I swiped my finger over the highlighter and applied it to my cheekbones, but then I literally said out loud, “where’s the color?”.  They are not pigmented at all even if you layer! I was so disappointed because you get 3 colors of highlight and all of them were unusable. Now I am a person that loves an intense glowing highlight, so if you’re looking for the subtlest of glows I would say that you might be able to get these highlighters to work for you, I personally would never use them though. Overall I would say avoid this palette and buy the eyeshadows separately and save your money.


Stunning Brows Eyebrow Gloss and Set ($14):

I’ve been obsessed with Glossier’s Boy Brow and this is a perfect alternate for it! For about the same price you get twice as much product, and the product gives you bold beautiful brows in 30 seconds or less. The wand is super easy to use and big so that you can quickly fill in your brows. And the formula is great in that it doesn’t flake, dry out, or smudge once it’s dry! I would absolutely recommend!


Well Conditioned One Step Gentle Cleanser & Conditioner ($16):

I’ve been co-washing my hair for about 6 months and I’m never looking back. My hair is super thick and dry and co-washing has made my strands so much happier. This co-wash smells like passionfruit (YUM!) and gets my hair super clean and super moisturized in 5 minutes! I absolutely love this product and will be repurchasing.


Tahitian Gardenia Body Butter ($15):

I received this as a free sample with my order but I will be purchasing a full size when I run out! The fragrance on this body butter is divine. It’s floral without smelling like your grandma’s house and it’s sweet without making you want to vomit, it’s the perfect happy medium. The formula is wonderfully hydrating without leaving you feeling greasy and like you can’t turn a door knob afterwards. 5 stars on this one!

IMG_0467

And there you have it! I hope you found this post helpful if you were on the fence about any of these products or that it inspired you to try out natural and cruelty-free skincare! I’ve also reviewed Herbivore Botanicals and some LUSH products, both of which are natural and cruelty-free as well! ❤

Thanks for stopping by and let me know in the comments if you have tried any of these or if you have any other skincare buys that you love and can’t live without!


xoxo

Advertisement

$300 Kitchen Cabinet Transformation

Happy New Year darlings!

My goodness the past few months have been INSANE right?! Between the holidays and the election results and the insane amount of dancing I’ve been doing (which I’m super grateful for, by the way) I have completely neglected this little ray of sunshine of a blog. But I’m back and I hope that you are finding as much inspiration and strength in all aspects of your life as I am this new year!

Alright so let’s get down to it. Here’s what my kitchen cabinets looked like before the transformation:

img_0299img_0298

BASIC. BLEH. BORING. A HOT MESS.

They are original to the condo and John refused to let me do anything to them in fear that it would make them “less appealing and harder to sell the place if we ever wanted to.” So I was on a mission to make him eat his words 🙂

And here’s the after:

img_0303

Dramatic right?! Bye bye drab, hello fab!

I wanted to do a two toned cabinet scheme and decided on the colors Crystal Cut for the top cabinets and Magnetic Gray for the bottoms, both by Behr.

The project took me a solid 14 days in total with painting around 6-8 hours each day. YEAH. It was insane. Luckily John was back home in New Hampshire for the holidays and I had a lot of time off from work so I was able to do it rather quickly. Trust me, the time is SO worth it for the end result!

Here’s what you’ll need:

  • Liquid Deglosser
  • Painters Tape
  • Primer
  • Paint
  • Topcoat
  • Foam Rollers
  • High Quality Synthetic Brush
  • Tarps
  • Clean Rags
  • New Hinges (optional)
  • A bunch of TV shows on Netflix to binge watch

Here’s how I did it:

  1. Start by clearing your work space and laying down tarps everywhere you will be painting. Trust me you will get sloppy and drip everywhere.
  2. Remove all of your doors and drawers from the cabinets and place the screws and hinges into some tupperware or plastic bags to keep them organized.
  3. Find areas in your home to lay all of your cabinets. I elevated my doors with random cans of food or boxes of pancake mix, really anything that would keep my doors off of the floor and stable as I painted.
  4. If your cabinets are particularly dirty give them a solid cleaning with some cleaner and a rag.
  5. Degloss EVERYTHING with a rag and make sure you wipe down every single surface.
  6. Tape off walls and floors with tape to protect areas you don’t want to get paint on.
  7. Now you get to prime! Use a foam roller and your synthetic brush to lay down a nice thick coat of primer over everything. Allow to dry. img_0300
  8. Now comes the time consuming part. The paint. I had to do 3 coats for the white cabinets and 2 coats for the gray. This takes forever when you have to allow one side to dry before you can flip your doors over to do the backside. But stay diligent and be sure to apply even coats and to check for drip marks as you go. This is where the Netflix shows will come in handy because the work is so monotonous and time consuming. I finished 4 series by the time I had finished!
  9. Once you’ve finished all of your paint coats, now we have to seal and protect that beautiful color! Apply your topcoat according to that brand’s instructions. Mine required three coats and to be applied with a synthetic bristle brush, no roller. If you use a roller you’re going to get bubbles and an uneven texture.
  10. Now the easiest part, allow your topcoat to cure. Take a break, you deserve it you’ve been working like mad!
  11. Apply clear rubber stoppers to prevent your doors from scratching when they close.
  12. Paint your hinges if necessary, and begin reinstalling the doors and drawers. This step is so satisfying as you begin to see the final product come together so quickly!
  13. Remove the painters tape and do any touch ups as necessary.
  14. YOU’RE DONE!

Now go get a massage and treat yourself because that was A TON of hard work!

img_0301

I am beyond ecstatic with the final result and couldn’t be happier with how much the paint brightened, opened up, and updated the whole kitchen!  And all for under $300! This experience also made me fall in love with how moody and grounding gray can be. ❤

img_0304-2

Now here are some little tid-bits to help you prepare yourself for your kitchen transformation:

  • This WILL take you an extremely long time to complete. Make sure you set aside ample time where you can live without your house because the cabinets will take over.
  • The paint lady at Home Depot said I was going to need 2 gallons of paint to cover my top cabinets and a whole gallon for the bottom. She was SO wrong. I used a little more than a half gallon for the three coats on the top cabinets and about a quarter gallon for the bottom. It doesn’t hurt to have extra for touchups but seriously?
  • Keep your receipts because I was able to return over $100 worth of supplies at the end!
  • When applying your topcoat it is very easy to slap on too much and drip marks will happen as soon as you walk away. Apply thin coats and triple check for drips because they sneak in there. And honestly after you’ve been painting for a week straight the last thing you want to do is be precise but if the drips harden they won’t sand off without taking the paint with it and they will be visible when you hang the cabinets up.
  • When I removed my painters tape, I had created such a thick layer of paint that I had to score along the tape with a knife to get it to come off. And to my dismay it ripped off parts of the paint with it. I was freaking out, but honestly you just go back in and touch up with a small paint brush and it’s like it never happened.

img_0302

If you decide to paint your kitchen cabinets I would LOVE to see some before and afters! It is honestly such a cost-effective way to create a huge dramatic change to your home, if you’re willing to put in the work.  😉

xoxo

Annie Sloan Chalk Paint Chair Transformation

Annie Sloan Chalk Paint. It’s stuff so incredible that it has a cult following all over the world. I came across the name too many times to count while I researched how to makeover this wingback chair I got on Craigslist for $40.


I love the shape of the chair, but that dark green color was so drab I just couldn’t leave it be. At first I was going to reupholster this bad boy but fabric (good, quality fabric) is pretty pricey and I also don’t know how to sew. So I found some tutorials claiming you could paint the fabric and it would still be comfortable.

Every tutorial I read recommended chalk paint for its porous nature, and almost every tutorial also said Annie Sloan was the queen of all chalk paints. I was sold.

Annie Sloan is only sold in boutique stores so it could be quite difficult to find a stocker near you. Go to the Annie Sloan website and you’ll be able to find the one nearest you.

I went to my closest stocker and decided on the Barcelona Orange color. I’m OBSESSED with this color it is absolutely fabulous. I started with one quart of paint, a large tin of wax, and the special Annie Sloan brush. This came to a shocking total of over $100! The paint will run you about $40 a quart (crazy!), the wax about $25, and the brush was about $40 as well.

Now I would absolutely recommend the paint and wax, however, I would pass on the brush. A standard synthetic bristle brush did a better job on my chair than the fancy Annie Sloan one did.

Also a note, depending on how big your chair is, you will most likely need more than 1 can of paint. My chair took an entire can for each coat, and 4 coats. That’s 4 quarts of paint! A bit pricey but I was also going from a dark color to a bright color so it needed the extra coats to get to the saturation I wanted.

Supplies you’ll need:

  1. Annie Sloan Chalk Paint (or any chalk paint)
  2. Large Paint Brush
  3. Spray Bottle full of Water
  4. Mixing Bowl
  5. Fine Grit Sandpaper
  6. Tarp
  7. Cloth


Alright here’s how you get started painting your chair:

  1. Lay your tarp down and prep your chair. Trust me this will get messy.
  2. Start by giving your chair a good vacuum and clean any stains. Allow to dry if needed.
  3. Dilute your paint in your mixing bowl in a 3-1 ratio of paint to water. You want to thin it out but not so much to the point that it is super watery. I found especially for my type of fabric with a higher pile, the thicker the paint the better.
  4. Spray your chair down with water so that it is really damp. This will help the paint soak in to the fabric.
  5. Start to paint the chair going with the grain to start with then side-to-side to really work the paint into the fabric.
  6. Let the chair dry for at least 24 hours.

    After one coat.

  7. Once dry sand down your chair with the sandpaper. This will restore the softness to the fabric. It will also lighten the color slightly.
  8. Now you can do a second coat using the same method.

    Second coat.

  9. Do as many coats as you need to get the color desired making sure to sand between each coat and after the final coat. Mine took 4 but most projects will only take 1 or 2.

    Third coat.

    Fourth coat.

  10. Once you’ve reached your desired color, it’s time to wax!
  11. Take a clean brush and wipe the wax on going with the grain of the fabric. Then wipe the excess off and work the wax into the fabric with a clean cloth. Be generous with the amount of wax you use, this is what will seal in the color and protect it from transferring color to other fabrics, like the backside of your jeans.
  12. Allow your chair to cure for a couple of days before normal use.

Voila!


I’m not going to lie this project did take quite a bit of time. With at least an hour of painting for each coat and the full 24 hours of dry time between coats, this took me about a week to complete working on it everyday. But the payoff is so worth it!

This is so much easier than reupholstering would have been and the fabric really is soft to the touch! Almost like a soft leather.

Let me know what you think in the comments below! Xoxo

$10 Mirror Transformation


So John’s old roommate is a self-proclaimed pack-rat. She was always saying how she needed to go through all the junk that had piled up in her bedroom and the hallway and the living room AND the kitchen. But nothing had changed by the time John had moved out.

We recently went to the Hillcrest Farmer’s Market with her and her husband and went back to their place afterwards to enjoy all the treats we had acquired. And low and behold the place had COMPLETELY transformed!

She said the book “The Life-Changing Magic of Tidying Up” had literally changed her life. I was in awe and so happy that she was able to do the work all herself! And also, it was a great day for me because she had a bunch of stuff she was about to send off to GoodWill.

I ended up taking this huge heavy mirror and an adorable wooden jewelry box.

Now the mirror was butt-ugly let me tell you, but I had other plans in mind for this bad-boy. I was also on a budget so I didn’t want to spend more than $10.

Here’s what I did:


Black with Gold Trim. Ew.

I started by priming over the existing paint and fabric trim with some old primer I had on hand. That trim was superglued on to the mirror so there was no hope of removing it without leaving residue or damaging the mirror.

Next I painted the whole thing in Martha Stewart’s Mother of Pearl Acrylic Paint, which is only $3! Two coats got me to the color and sheen that I wanted.


I LOVE the pearl finish dont you??

Next I hot-glued these awesome rocks I found at Michael’s onto two of the corners. I bought two bags but definitely could’ve gotten away with just one. Depends on how rock crazy you wanna get!


Voila you’re done!

This DIY was ridiculously easy and took no time at all. And best part is that it is totally customizable to your color preferences and of course that it is super budget-friendly too! If you don’t have a mirror on hand that you want to do this to then go look in the free section of Craigslist! You’re bound to find some old dirty mirror to transform into your own one of a kind piece 🙂


Notice that jewelry box on the dresser? That’s the one I took from John’s roommate! All I did was spray paint it in Krylon’s Metallic Copper to give it a fresh update!

Hope this gives you some inspiration for your own home! xoxo

Craigslist Dresser Transformation

I’ve been on a Craigslist binge lately. I seriously can’t believe some of the things that people are *literally* giving away for free! It’s crazy addictive and for those of us who love to customize and DIY just about everything in our homes, it is a frugal and eco-conscious way to decorate your space.

My latest find was an awesome solid wood dresser that this woman was selling for only $25! Just from the pictures alone I could tell that it was a solid, quality piece of furniture. I immediately contacted her and arranged a pick up date.

I had to borrow my friend’s truck (thanks Alyssa!) cause that thing was not about to fit into my little Prius C!

Once we got to the seller’s home (an ocean front condo in La Jolla (#jealous) I met with the woman, who by the way was so incredibly fun and spunky and was basically my spirit animal, and she showed me the dresser. We were chatting a bit and she asked me what I do for a living and I said “Oh I’m a professional dancer and teacher.” It took her less than a second to respond with “Oh my gosh you’re an artist!? Take the dresser for free!” WHAT?! I was floored by her generosity and appreciation for artists; it was a breath of fresh air to meet someone who values the arts so enthusiastically.

I tried again and again to pay her for the dresser but she refused, and then continued to show me things she wanted me to take! She was in the middle of moving to another condo down the street that was higher up with an even BETTER view, yeah, it’s a tough life haha. I ended up leaving with the dresser, a storage ottoman, 2 rugs, an assortment of beautiful pillows and blankets, kitchen ware, and a GORGEOUS capiz-shell chandelier that I have been eyeing at Pottery Barn for like 3 years! And all for FREE.

I must have had some amazing Craigslist karma cause that day was a dream. ❤

Anyways, on to the transformation!

Here is the before picture:

img_9355
Brown. Basic. Ugh.

And here is what I turned it into:

img_9356

Super cute right?!

Here’s the materials and methods I used:

Materials:

  • Dresser
  • Sanding Block (I used 220 grit)
  • Primer (I used a Kilz primer)
  • 1 Quart of Paint (I went with the color “Light Quartz” by Benjamin Moore Advanced)
  • Painting Supplies (foam brushes, foam rollers, drop cloth)
  • Hardware for Drawers

Method:

  1. I started by removing the old hardware and sanding down the whole thing with my sanding block and then wiping it all down with a wet cloth to make sure there was no dust left behind.
  2. Next I primed everything with a nice thick coat of primer. I used a foam roller to do all the large surfaces and then a small foam brush to get into all the tiny details.  
  3. Allow the primer to dry and then apply 4 coats of paint. I did this many because my color was the faintest shade of pink and it really took all the coats to get to the color that I wanted. The first couple coats just looked white to me.
  4. Allow the paint to cure (about 16 hours).
  5. No top coat needed! The great thing about the Benjamin Moore Advanced paint is that it levels and hardens to a furniture quality almost lacquer like finish. Super durable and smooth.
  6. Attach your hardware. I found mine at Anthropologie and they were on sale for only $5 a piece! I freaked out when I saw the price cause the other knobs I was looking at were $20 a piece. Not exactly in my budget.  Slash these are too freaking adorable!For the bottom drawers I ended up spray painting the pulls a metallic copper by Krylon to help bring out the pink tones in the paint.
  7. Admire your beautiful new piece of furniture!

IMG_9357.PNG
Pretty awesome am I right?!

The project is really simple and easy to do, just a little time consuming as you have to wait 16 hours between each coat of paint. It took me a week to complete this project, painting about an hour each day. And the whole thing only cost me about $80 to do!

img_9358
What do you think? Do you have any Craigslist furniture transformations? I’d love to see them!

xoxo

Oil Pulling and Why I Love It

img_9175

So by now I’m sure you’ve heard of the new trendy detox technique: oil-pulling.

What is it exactly?

Oil pulling is an ancient Ayurvedic practice that involves swishing a tablespoon of oil for 20 minutes, on an empty stomach, in order to improve oral and overall health.

Basically, the act of swishing the oil is thought to draw out toxins and remove harmful bacteria that collects in your mouth.

Benefits include:

  • Whiter teeth
  • Fresher breath
  • Strengthens teeth and gums
  • Cures headaches
  • General detox
  • Overall improved oral health
  • It is also said to be helpful for people with depression and insomnia

I am obsessed. I mean come on, what’s not to love right?!

Okay okay, most people who try it say that the hardest parts are getting used to the texture of the oil and swishing for the FULL 20 minutes. But from my personal experience, it’s TOTES worth it. And here’s why I think so:

  1. My teeth were noticeably whiter within a few days!!! I’ve tried all the toothpastes and whitening trays and I have to say this was just as effective if not MORE so. PLUS it’s totally natural without any yucky chemicals.
  2. My gums have been slowly receding for a couple of years now, but since I have started oil-pulling they have actually grown back a considerable amount! And I hadn’t changed anything else in my daily routine so it MUST have been the magic of oil-pulling.
  3. It clears any grogginess I have in the morning. If I ever wake up feeling less than bright-eyed, I make sure to oil-pull because as soon as I’m done I feel focused and ready to go!
  4. Less breakouts. Now I can’t know for sure if I can give oil-pulling full credit for this one, but I have noticed fewer breakouts around my chin. Which typically is a sign of hormonal imbalance. So perhaps the reduction of toxins has helped balance my insides! Regardless, it equals less zits which equals a happy Andy!
  5. It’s like a built-in lip balm! I always manage to get oil on my lips as I do my 20 minutes which acts like a lovely natural lip balm! Which means less lip balm throughout the day! Bonus!

So there’s my personal testimony. I’ve been oil-pulling for about 4 months now and all I can say is that I am addicted. I have not experienced any negative reactions or side-effects and I must say that when I miss a day I can really feel the difference! You should definitely give it a try!

Here’s a how-to guide for all you newbies. 😉

  1. Choose your oil. I use an organic and raw coconut oil. It’s cost-efficient, the taste is pleasant, plus it has anti-bacterial properties! An added bonus to the detox you’re about to embark on. You could alternatively use just about any oil you’d like such as olive, hemp, or pumpkin. Just make sure it’s organic!
  2. In the morning* when you wake up, rinse your mouth out and drink a glass of water. Now take 1 tablespoon of oil and begin to gently swish it around, making sure the oil gets to all parts of the mouth. Set your timer.
  3. After 20 minutes is up, spit the oil out into the trash. (Don’t spit into the sink as the oil could harden and clog up your drains! No bueno.)
  4. Rinse your mouth out with water and go about your morning!

*If you choose to do your oil-pulling at a different time of day just make sure that you have not had food within the last 2 hours!

There you have it! Easy-peasy!

Now if you’re like me, you probably don’t have 20 extra minutes every morning. I fit this into my schedule by plucking my eyebrows, shaving, picking out an outfit, checking e-mail, or by making my breakfast while I swish. That way I am still being productive while I reap the benefits of this wonderful practice.

What oils do you use for your oil-pulling practice? And what benefits have you experienced? I would love to hear all your success stories in the comments below! 🙂

DIY Charging Station

Hello all! I hope everyone had a wonderful Thanksgiving and a restful weekend!

This week I’m sharing with you this awesome (and incredibly easy) DIY. A charging station to house all your electronics!

John-John and I are trying to keep our bedroom an “electronics-free zone,” so that means no phones and no iPad in the bedroom after bedtime. This also means that we had charging cords all over the place; all those cords were giving me some serious anxiety. I don’t know about you but I HATE having to plug and unplug and search for phone chargers, it’s a problem.

So we needed a place where we could keep all our electronics nice and tidy and the cords hidden away. And then this was born!

It’s a simple letter organizer I found at Home Goods (it was priced at $20 but it was scratched so I got it for $15!).

Here’s what you’ll need:

  • Letter Organizer
  • Sanding Block
  • Spray Paint
  • Drill and Drill Bit Set

Take your letter organizer and give it a little sand down if you plan on painting it. Wipe off any dust with a damp cloth and then go to town with your spray paint of choice, I went with a metallic silver.

Let it dry and then get your drill. Use a drill bit big enough to allow a cord or two to slip through. I made two holes in the back and made two matching ones in the slot in the middle so that the cords could reach both slots.

Dust off and you’re all done! Now you have an adorable place to store and charge up your devices! And the best part is that you can use as many cords as you need so that you can simultaneously charge everything!

The charging station really adds a clean look and keeps everything organized nicely! What do you all think?
Enjoy lovelies! xoxo

Cowspiracy. Why you need to watch this film NOW.

Grab some wine. Get your computer. Prepare to assess your life and make some changes.


Cowspiracy has just reinspired me to go vegan for ALL the right reasons.

From the ethical to the environmental, this film puts all it in front of you to show you that we are not only slaughtering billions of animals, we’re killing the Earth. And if we don’t make some drastic changes soon,  there won’t be a planet to call home anymore.

I love the filmmaker’s approach to the subject by interviewing environmental groups to find out why they aren’t the ones pushing the cold hard facts to the public. Why are they becoming a part of the problem by not informing us that the production of meat and animal products is consuming incredible masses of water, land, taxpayers money, and food that could be used to feed the millions of hungry people all over the world?


He himself goes on a journey of not being educated in the facts surrounding animal agriculture and we as viewers get to look in on his experience and evolution.

One scene in particular where we see a duck get slaughtered, literally made my body seize and overwhelmed my mind with sadness. So many people will never witness another living soul be murdered right in front of their eyes. But once you’re faced with the reality of what has to happen for your dinner to get to your plate, all of a sudden it doesn’t seem so worth it.

The pain. The lack of compassion. The helplessness of these sentient beings who want nothing but to live. If you couldn’t do the deed yourself, why have someone else do the dirty work for you?

I plead you to give this film a watch and to realize that you have a responsibility as a human to make a change. For the future of the planet, for your health, for the animals, for your own humanity.

DIY Silver Leaf Nightstand. What NOT To Do.

Here’s another DIY project I took on this last week to share with you guys.

I found these awesome little tables at Target in the college section for about $50 a piece. We managed to get 10% off one of them since it was pretty beat up.


I loved the shape and the legs on the tables, but I was not so crazy about the black. Black is just so bleh to me. I want metallics and colors and GLITTER!

I decided to do a silver leaf finish on these bad boys after being inspired by this GORG gold leaf nightstand over at crab+fish.

I bought my materials mostly on Amazon and also Blick’s Art Supply.

Here’s what you’ll need:

  • Tables
  • Sanding Block
  • Adhesive Size (Mona Lisa works great) and a Foam Brush for application
  • Metal Leaf (if you’re going with silver make sure it’s the aluminum kind so that it won’t tarnish over time) I used about 70 sheets to cover my two tables.
  • Stubby Natural Hair Brush
  • Metal Leaf Sealant (Mona Lisa Brand)

Make sure you work in an area with a hard floor because there will be little bits of leaf EVERYWHERE.

Start off by giving your tables a light sand down and then wipe clean.

Then apply a light coat of adhesive size to your tables, making sure that you get every single spot that you want leaf to be applied. If the size isn’t there, the leaf won’t stick.


Wait 30 minutes then grab your leaf.

Starting from the middle, apply your first sheet very gently. Apply a few more pieces around your initial piece making sure to overlap them so that you don’t have any space in-between.

Take your natural hair brush and give the leaf a brush down so that it adheres to the table. DON’T brush away the excess just yet because it will fly and get stuck to the table and won’t come off, giving you bumps and a rougher finish.

Continue along until you’ve covered the whole piece. This will take a long time and some of your sheets will break and it will get a bit frustrating. But truck along and you can use any pieces that fall off to fill in holes later.

When you’re all done take your natural hair brush and brush down the whole thing to get rid of any excess bits of leaf so that you have a smooth finish all over.

Now move your tables outside or into a garage and apply your sealant. The spray is super easy to use and dries in 15 minutes so that you can do your 3 coats in no time flat.

Ta da! Now you have a gorgeous piece of metal-leaf furniture!


Now here’s a bit of advice of what NOT TO DO, as I learned the hard way.

  1. Go slowly when applying the leaf because the slightest wind will blow your leaf and once it is stuck to the adhesive there’s no going back.
  2. Make sure you have enough leaf. I started my project only to realize once I had finished the first table that I didn’t have nearly enough to finish my second one.
  3. DO NOT use a metal leaf paint to fill in holes and gaps. It will not look the same whatsoever and will be super duper obvious when you’re all done.

Have any of you done a metal leaf project? I wanna hear about them in the comments below! xoxo

DIY Farmhouse Dining Table for Under $300!

You guys! I BUILT A FREAKING TABLE!

I am pretty impressed with myself for how beautiful it turned out! Especially since I have NEVER used a power tool in my life.


This was a big undertaking but I have to say it was well worth the time and effort because I absolutely adore my new table and I love that I didn’t have to pay $2000 to buy one!

I found the plans for this table over at the fab site Shanty 2 Chic. This site is awesome you can find plans for just about any project and they’re all FREE. Jackpot.

Now, she was able to do it for $110. However, when I went to the Home Depot, I bought the most inexpensive wood I could find and it totaled in at around $200. Hopefully you will have better luck than I did!

This project took me about 2 weeks to complete working on it off and on. I think you could totally finish the construction if you dedicated a whole weekend to it.

Here are some things I learned along the way, being a COMPLETE newb to carpentry:

  1. Get the good tools. I attempted to start cutting my wood with a freehand circular saw. It’s almost impossible to get straight lines with that thing. Get a compound miter saw and you will save yourself the headache of re-cutting all your wood to get straight lines! (I was able to borrow one from John-John’s school but you can rent them at the Home Depot for around $40 a day!)
  2. Make sure you have all the tools you need before you begin:
    • A powerful drill with a a drill-bit set.
    • Compound miter saw.
    • Electric sander.
    • Kreg Jig System and the longest clamp you can find (I got mine from Amazon).
    • A work table or a pair of saw horses.
    • Gloves, protective glasses, and ear protection.
  3. Measure twice, cut once. I think this one is self-explanatory. 😉
  4. If some pieces are not perfect, it will be ok. There are a few 45 degree angle cuts for this table, and let me tell you not a single one of mine were correct! But I said “screw it” and it ended up working out just fine. I was close enough to fudge it and to be honest now it gives the table a bit more character and it also gives me something to laugh about whenever someone notices. 🙂
  5. You will make about 20 Home Depot trips just because you forgot something or you need just ONE more paint brush.
  6. You can TOTALLY do it by yourself. The only time I needed help was getting the thing up the stairs into my condo!
  7. HAVE FUN. I mean you’re building a table for goodness sake. Take your time. Learn.

I ended up painting my table a bright aqua color called Thai Teal, by Glidden, in a high-gloss because I wanted a bright pop of color in our condo; everything is super brown right now so I needed to make a big statement. Home Depot doesn’t carry Glidden though, but they’re able to look up the color and create the same exact color, just in Behr! (which I prefer anyways for its superior quality)


I did one coat of Behr primer/sealer, two coats of paint, and then 5 coats of Varathane Clear Gloss Polyurethane in Gloss. I HIGHLY recommend this top coat. It is mega-durable and gave my table a gorgeous almost lacquer-like sheen. This is the most time consuming part just because you have to wait about an hour to two hours between coats.

All in all I spent about $300 for this beauty! I even found the awesome vintage swedish chairs on Craigslist for $80 total! So for the entire set it was less than $400! However I will say that if you have to purchase tools, your costs will be much higher than my estimate. But ask around! You’d be surprised how many of your friends have tools laying around just waiting for you to come borrow them! Maybe bake them some cookies as a thank you for saving you hundreds of dollars. 😉

And ta-da you’re done! I hope this helped you guys and let me know if you end up making a table for yourself! xoxo